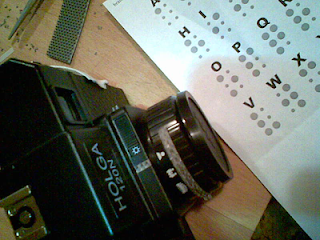
I chose a Holga for this project because I thought the camera would lend a certain intimacy to the photos and also, more than likely, a dash of "uncertainty" to the process. Plus, I love working with medium format and immediately try to share my enthusiasm with folks who have only experienced 35 mm.
Anyone who has used a Holga knows how temperamental these lightweight plastic cameras can be. While they are cheap and can be toted around like a toy, each one is different -- with its own quirks and (sooner or later) problems.
My Holga has so far demonstrated a pretty good ability to take clear pictures. The back doesn't fall off and the lens usually stays where you set it. The lens appears to be one of the better ones and gives crisp images, or as crisp as a plastic lens can. I still have the lens cap, and the shutter still works. The tripod attachment can get a bit funky, so you don't want to screw it on very hard. But other than occasionally leaking light (making for interesting vignetting), the camera most often does what one tells it to do.
I paid somewhere around $35 for my camera at Glazer's, the Mecca for darkroom photography here in the Pacific Northwest, and have endured No End of Eye-Rolling and Rude Remarks for paying such an exorbitant figure for it. As you well know, artists are ... frugal. They make cameras out of things like cardboard boxes and zucchinis. But at the time I was in a hurry to complete a class project requiring a medium format camera and didn't have time to order a cheaper camera online.
I modified my camera somewhat so that Susan could find the different apertures and determine her focusing distance. I say "the different" apertures, but actually there are only two: f8 (i.e. "Cloudy") and f11 (i.e. "Sunny"). Coming from the factory, these settings have little imprints, one depicting clouds and the other sun.
I modified my camera somewhat so that Susan could find the different apertures and determine her focusing distance. I say "the different" apertures, but actually there are only two: f8 (i.e. "Cloudy") and f11 (i.e. "Sunny"). Coming from the factory, these settings have little imprints, one depicting clouds and the other sun.
To make my modifications, I used an extreme version of Velcro(R) which has a very sticky backing -- suitable for using on brick -- and nibs that are stiff and can be felt individually from one another. I worked these with an X-acto knife so the nibs made Braille letters, then cut them out and affixed them to the aperture settings.
For shutter distances, I carved rows of nibs that counted out "1", "2", "3" and "5" settings which represented 1, 2 and 3 meters, and infinity, respectively.
The Holga has two shutter speeds: Normal, which is approximately 1/100th of a second (until the spring is fatigued and either breaks or slows down); and Bulb, which will hold the shutter open as long as the shutter lever is held down. As a side note, Bulb setting is the one I normally use, as I like to shoot in the dark and illuminate my subjects with various kind of lights like flashlight and candlelight. For now, suffice it to say I made labels for these settings as well.
To see a typical Holga, click here.
No comments:
Post a Comment
Add your comment:
Note: Only a member of this blog may post a comment.